Insightly CRM Onboarding Part 1: Overview & Initial Setup
Overview & Initial Setup
Welcome to your guided on-boarding training! In this series, you will receive helpful content to help you familiarize yourself with the Insightly CRM product and best practices for setting up your account.
Before we begin configuring your user settings, we will start off by introducing some of the terminologies that you will come across on the platform. We call these the Insightly Building Blocks.
Building Blocks
As you learn more about Insightly, you will come across three major components: objects, records, and fields.
The items in the navigation bar on the left-hand side of your Insightly account are examples of objects. When you click on the contact object, you’ll see a list of contact records. When you click on a contact record, you’ll see the fields that contain the information specific to that contact.
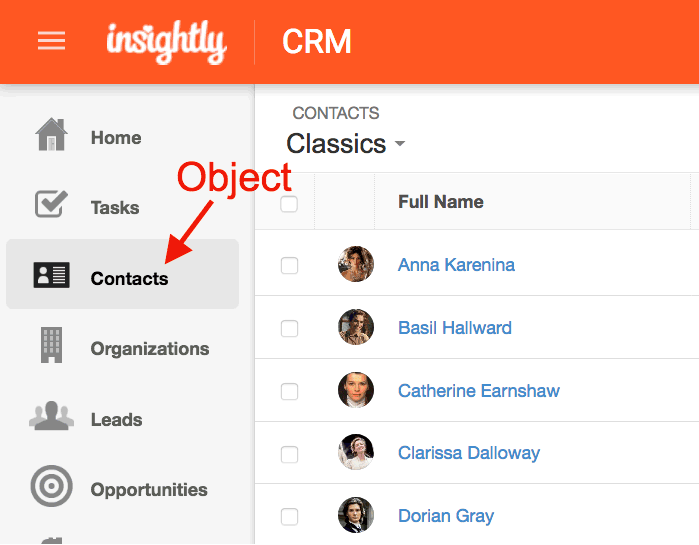
Objects
An object allows you to store and organize record data in Insightly. Insightly has several standard objects, such as contacts, opportunities, and tasks, where you can store your information about a person or a company in separate spaces, but under the same record.
Users can create custom objects to store specific information that is unique to your business and doesn’t fit within Insightly standard objects. We will talk more about Custom Objects later in the onboarding series.
Records and their fields function based on how an object is set up. For example, a company that manufactures roller skates could customize their opportunity object so that its records include a field with a drop-down list of shoe sizes. Every time a new opportunity is created, the salesperson will select a size from that list.
Records
Records live within objects and contain fields and organize the data you’ve collected. Records can also be linked to other records.
For example, Organization records can be companies that you do business with. Say you run a business selling treats for pets. You could create an organization record for the local shelter to keep track of who runs the shelter, how to contact them, and any special discounts they receive.
Fields
Fields are essential to setting up your account and recording data about your prospect and customer base. The purpose of fields is to house all of your data and information that is critical when providing context to your business.
Insightly has standard fields that are built into every account such as “First Name”, “Last Name”, “Email address”, “Company”, etc. You can also create custom fields to work for your specific business needs, such as “T-shirt size”, “Birthday”, or “Car model”.
There are several field types that Insightly supports, you can learn more about customizing your fields in this helpful article.
Standard fields are meant to help simplify the setup within your system. Fields that are not applicable to your business should be hidden from your page layout in order to minimize fields that are not useful and to also eliminate confusion. We will go over setting up your page layouts in a later section, but you can read more about layouts in the meantime.
Initial Setup
Now that you’re familiar with the building blocks, it’s time to configure your Users Settings in order to personalize your account. In this section we will go over:
- Linking your Email Account
- Linking your Calendar
- Customizing your notifications
- Choosing your Country and Language
Linking your Email Account
Insightly enables you to connect your email account directly to your CRM by connecting your email account to Insightly, you can send email without leaving your CRM, create reusable email templates, and automatically save a copy of your sent messages to the Insightly Emails tab.
Here’s a quick video on how to link your email account:
Note: Check in with your email administrator before connecting your email account to make sure you’re using the correct service provider and credentials to access it.
Setup steps:
- Login to Insightly CRM
- Access User Settings, and click “Email Accounts”
- Select your email provider
Note: If you do not use either Gmail, Office365, or Outlook.com, then choose “Other” and connect using your service provider’s SMTP Server. If you don’t know the provider’s SMTP server, please get in contact with your email service provider.
Linking your Calendar
Calendar sync is a feature that allows you to sync your Insightly calendar with Google Calendar or Microsoft Exchange calendars (including many Outlook installations).
By syncing with Insightly, any events added or edited in one calendar will be instantly updated in the other. Which will save time for your sales reps by eliminating manual data entry.
To access Calendar Sync setup, go to User Settings and click Calendar sync. Choose from the options in the dropdown menu and enter your credentials for the calendar service provider.
After connecting to your external calendar, you’ll see your Google or Exchange calendar events on your Insightly calendar. Since this feature syncs both ways, your future Insightly calendar events and those from the last two months will also appear your main external calendar.
A few things to take a note of:
- Exchange calendar sync is supported for Microsoft Office 365 and Microsoft Exchange Server 2013.
- From Insightly, you can view items that have been synced from your external calendar but you cannot edit them.
- Insightly will sync to and from your default calendar only. Custom calendars will not be synced with Insightly.
- Tasks and milestones cannot be added or edited from your Google or Exchange calendar; you may only edit these items from Insightly.
- If you are using a free email service with domains such as yahoo.com or hotmail.com, you cannot use the Exchange calendar sync.
Notifications
Email notifications can be setup to let your sales reps or users know when specific events occur in Insightly. For example, when a new record is assigned to you, a task has a reminder coming up, or changes are made to a record.
You can access these settings by going to your User Settings and clicking on “Notifications.” Check the boxes for the notification emails you wish to receive.
Choose Country and Language
You can further personalize your Insightly account by selecting your region and language. Each member of your team also has the ability to set the country and language settings they prefer. Go to User Settings and scroll to the bottom. Select your country and preferred language.
In part two of this on-boarding experience, we’ll delve into importing, customization, and task management. If you’re ready to move forward, you can skip ahead to part two.