Insightly CRM Onboarding Part 2: Customization, Importing, and Task Management
Customizing Insightly for your Business
Now that you’ve configured your user settings in part 1 of our onboarding series, and have some of the initial setup completed, it’s time to customize your Insightly account to fit your business.
But first, it’s a good idea to have an understanding of the Sales Flow. This part of your onboarding will be focused on your journey with leads.
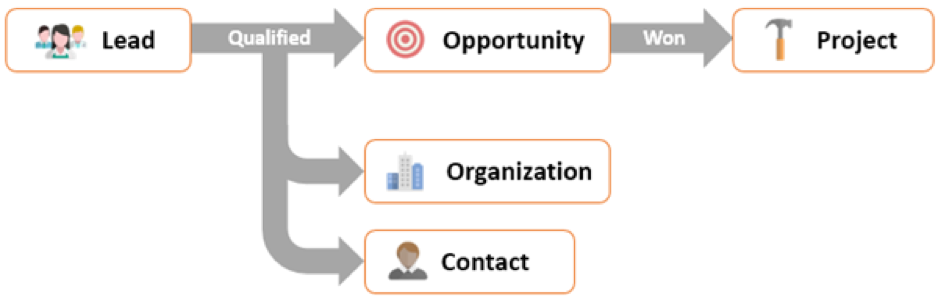
When a lead becomes qualified, it gets converted to an opportunity. When the opportunity is created, an organization record and a contact record are concurrently created. If you win the opportunity (i.e. close a deal), the opportunity can be converted into a project.
So what is a lead? Per the Insightly Glossary, leads are people – your prospects. They can be potential customers, clients, or donors. Leads have not yet been identified or qualified as a potential sales opportunity.
When you determine that a lead is “qualified” (a definite sales possibility), you can convert it into an opportunity, which will also create a contact record and an organization record. A “qualified” lead could mean they’ve agreed or completed an initial meeting or demo, or they’ve responded positively to your outreach – it’s up to you to decide what your qualifying event is!
Leads must be enabled by your Insightly administrator. Read this article to learn how: Setting up your account for lead management.
A big part of the lead management process is customizing your lead statuses and lead sources. Customizing can be really valuable because you’ll be able to see views of where all your leads stand, like whether or not you’ve connected with them, as well as where most of your leads are coming from (especially if they turn into won opportunities!).
- There are a few different ways you can manage your leads:
- Manually entering them
- Importing them from a CSV (more on this shortly)
- Scanning a lead’s business card with our mobile app
- Adding a Web to Lead form (Webforms)
- Or if you have technical resources, through our Insightly API.
For more detailed information, check out this article: How to create and manage leads.
As you reach out to your leads, you can start sending emails, setting tasks, adding notes, and updating the lead status appropriately.
Then, when you’re ready to close your lead, you can convert that lead into an opportunity. If your lead is not interested and declines, you can also mark that lead as closed and disqualified. You can save the record in case they change their mind and reach out to you in the future or if you plan to reconnect with them at a later date. Here’s an article describing that process: Converting a lead to a sales opportunity.
Custom Fields
There might be information that you need to enter that doesn’t fit into Insightly’s standard fields. You can create custom fields to capture this data. Later, you’ll be able to clone and map these fields as your lead is turned into an opportunity and link contact and organization records.
For example, a common custom field for a lead is product interest. You can create a custom dropdown field that lets you record whether their interest in your product is high, medium, or low.
After you create a custom field for a lead, you can then clone and map it to appear on other Insightly records when you convert them. You can use page layouts to control where this custom field appears.
To further customize your account you can review these helpful guides:
The Insightly Importing Guide
Once your custom fields are set up, you’re ready to import. Not just leads, but organizations and contacts too!
Insightly also includes sample records and settings on every new account. Play with the sample data before you import to familiarize yourself with Insightly’s records and features. When you’re done, delete them and start importing your own data!
For the best results, you should import organizations before contacts, so that any contacts that are imported will be automatically linked to the organization (provided there is a column for organization). Leads should be imported last.
Using Tasks in Insightly
One last thing – after you finish your import and start to track activities on your records, tasks will help make sure none of your action items fall through the cracks.
You can add tasks and reminders to any Insightly record from the activity tab. They can be marked as complete from the activity tab or on the tasks page of Insightly. Check out this help article and this video to see how:
In part three, you’ll learn how you can use Insightly to manage your sales. Click here to skip ahead to part three.